Crispy Puff Pastry with Creamy Ham & Cheese Filling
A Last-Minute Idea Before Work
I was sitting in the living room before work, already thinking about what kind of sandwiches I could make for us to take along. I make cold sandwiches quite often, but this time I really wanted something different.
The only problem was time. I had maybe an hour and a half to get everything sorted before leaving, so at first I gave up on the idea. Let's just say I was tempted to take the easy option. 😄
Then I remembered there was a sheet of puff pastry in the fridge.
We use puff pastry quite a lot, and I already knew it only takes around 12 minutes to cook in the air fryer. That suddenly made the whole idea seem much more realistic. My partner absolutely loves these pastries too, so there wasn't much left to think about. Decision made.
This is actually a recipe we've made many times before, and one batch is honestly never enough. Most of the preparation takes only a few minutes, then it's really just a matter of layering everything together and letting the air fryer do the rest.
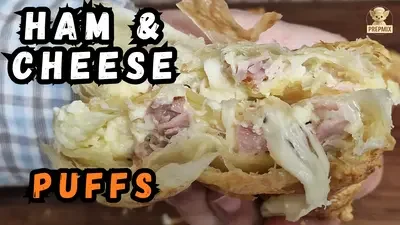
You don't need many ingredients either, but the result is ridiculously good: crispy, flaky pastry on the outside with a warm, creamy and cheesy filling inside.
And that's exactly why I thought it was finally time to bring this recipe here and share it with you too. 😊
📝 Ingredients
Makes 4 Large Puff Pastries
🥄 Instructions
How to Make Ham & Cheese Puff Pastries
Prepare the Ingredients
Start by finely chopping one small red onion, then cut the ham into small pieces.
Grate the cheese if needed and set it aside.
Crack one egg into a small bowl and beat it well. We'll use this later both around the edges of the pastry to help seal it and over the top to give our pastries a lovely golden finish.
That's most of our basic preparation already done.
Make the Creamy Cheese Filling
Add 4 tablespoons of sour cream to a mixing bowl, followed by half of the grated cheese – around 100g.
Add 1 whole egg, then season with garlic powder and freshly ground black pepper to taste.
Mix everything together thoroughly.
Don't worry if the mixture looks quite loose at this point. The egg will cook and help the filling set as the pastries cook, and it will continue to firm up a little as they cool.
Cook the Ham and Red Onion
Heat 1 teaspoon of butter and approximately the same amount of oil in a frying pan.
Add the chopped red onion and ham and cook them just long enough to remove their rawness and cook away any excess liquid that appears in the pan.
Season with freshly ground black pepper to taste.
Once they're ready, take the pan off the heat and allow the mixture to cool completely before using it.
And that's it for the preparation. We can start putting everything together. 😄
Assembling the Puff Pastries
This is how we like to layer ours, but as you already know, there aren't many strict rules in cooking. 😄
Divide the sheet of puff pastry into 4 roughly equal pieces.
For each piece, start with a layer of grated cheese.
Next comes the creamy sour cream and cheese mixture. I usually use approximately 2 tablespoons for each pastry.
Add a portion of the cooled ham and red onion mixture. A little trick I use is to divide the mixture into four portions while it's still in the frying pan. That way, I know each pastry will get roughly the same amount.
Finish with another layer of grated cheese.
So our layers look like this:
Cheese → Creamy Filling → Ham & Red Onion → Cheese
Simple. And definitely not short on cheese. 😄
Folding and Sealing
When adding the filling, always leave a clear border around the edges of the pastry.
Brush those exposed edges with some of the beaten egg. This helps the two sides of the pastry stick together when they're folded.
Fold the empty half of the pastry over the filling and press the edges together firmly with your fingers.
Next, use a pastry wheel to trim around the three joined sides, removing just enough pastry to tidy up any edges that don't line up properly.
Then go around those three edges once more with a fork, pressing down firmly to seal the pastry and create that familiar crimped edge.
Using a sharp knife, make 2 small cuts in the top of each pastry. These give the steam somewhere to escape while the filling is getting hot inside.
Finally, brush the tops with the remaining beaten egg.
Air Frying
Preheat the air fryer to 180°C (356°F).
Once preheated, add the pastries and air fry at:
180°C (356°F) for 12 minutes
They should come out beautifully puffed, crisp and golden.
Air fryers can vary slightly, so if yours needs another minute or two to get that lovely golden colour, simply give them a little longer.
Don't Eat Them Straight Away... If You Can Resist 😄
This is probably the hardest part.
Let the pastries cool for a little while before eating them.
Apart from saving your mouth from extremely hot melted cheese, resting also gives the creamy filling time to settle and firm up further.
They're still wonderful warm – just give them a chance to rest first.
And if everything has gone according to plan, there's really only one thing left to do:
Enjoy! 😍
Why You’ll Love It⭐
There are no unusual ingredients and no complicated techniques involved. Most of what you need might already be sitting in your fridge.
The sour cream, egg and cheese create a creamy centre, the ham and red onion make the filling more substantial, and the extra layers of grated cheese make sure there's plenty of melted cheese in every pastry.
Then everything is wrapped inside crispy, golden puff pastry.
They also don't take long to make. Once the ingredients are prepared, it's really just a case of layering, folding and letting the air fryer take over for 12 minutes.
For us, they're exactly the sort of food that proves something doesn't need to be complicated to be seriously tasty.
💡 Pro Tips & Variations
Cool the ham and onion completely.
Putting a hot filling onto puff pastry can soften the dough before it even reaches the air fryer.
Leave the edges clear.
However tempting it is to squeeze in even more filling, you need enough clean pastry around the outside to create a proper seal.
Use the egg around the edges.
It isn't only there to make the top golden. Brushing the edges before folding helps the pastry stick together.
Give the edges a final press with a fork.
After trimming the pastry, pressing around the three joined edges with a fork helps create a secure seal and gives the pastries a neat crimped finish.
Don't make huge cuts on top.
Two small openings are enough to allow steam to escape.
Divide the ham mixture before filling.
Splitting it into four portions in the pan makes it much easier to distribute evenly.
Give them time to rest.
The filling will be very hot and relatively soft when it first comes out. It becomes more settled as the pastries cool.
✨ Final Thoughts
This recipe started, on this particular day at least, with me sitting in the living room wondering what on earth I was going to make before work.
For a moment, a cold sandwich seemed like the sensible option.
Then I remembered the puff pastry. 😄
Not much later, four golden ham and cheese pastries were sitting in front of us, ready to take to work. That's one of the reasons we've made these so many times: they're quick, they're made with simple ingredients, and they always feel like much more than the effort that went into them.
Crispy on the outside, creamy and cheesy in the middle, with ham and red onion tucked between the layers.
Simple, but sometimes simple is exactly what you want. ❤️














ℹ️ What do these badges mean?
El fogom készíteni! Ez is - mint amit eddig kipróbáltam - biztos nagyon finom lesz! 😊❤️
ℹ️ What do these badges mean?
Elkészítettem, nagyon finom lett, laktató étel! 😊❤️